
How to get creative with dehydrating food – and reduce food waste, too

What’s the first kitchen tool that comes to mind when you think of home food preservation? For many people, it’s probably a freezer or a canning jar, but if you want to put up a lot of food, especially if you don’t have a lot of storage space, a dehydrator can be your new best friend.
Dehydrators work by removing moisture from foods at a low temperature and with sufficient airflow to dry foods evenly. The process works best at lower temperatures which don’t cook or scorch the food. In fact, many dehydrated foods are considered “raw” because they are dehydrated at under 118 degrees Fahrenheit.
Today, many electric dehydrators are available, but people also build outdoor solar dehydrators or just dry their food in the oven on the lowest setting.
Here, we learn the ins and outs of dehydrating from Jeanette Hurt, the author of 15 books on food and drink, including Dehydrating: Simple Techniques and Over 170 Recipes for Creating and Using Dehydrated Foods (The Self-Sufficient Kitchen), and Christina Ward, author of Preservation-The Art and Science of Canning, Fermentation, and Dehydration, and the Master Food Preserver for Wisconsin.
Why dehydrate?
Part of the beauty of preserving with a dehydrator is its simplicity. Hurt says, that while canning takes several steps, dehydrating is “perhaps one of the easiest ways to preserve food – just prepare it, put it in the dehydrator and go about your life.” Another bonus to dehydrating is that the final product isn’t bulky. As Hurt notes, “freezing is easier, but it takes up a lot of space.”
Ward agrees that dehydrated foods are easy to store and transport, and looks to the past for inspiration: pemmican, a traditional U.S. and Canadian Indigenous food made from tallow, meat and sometimes berries, is a good example, as is jerky and hardtack, a dehydrated, cracker-like bread that was common fare on ships centuries ago. She notes that some dehydrated foods are dried for storage but intended to be reconstituted before eating: dried mushrooms and peas, for example, are best when added to a soup rather than eaten out of hand.
And she adds a food safety note: “If using reconstituted, partially dried foods, be sure to cook thoroughly. Though safe from pathogens due to the removal of the moisture, there is always a possibility that re-adding moisture can cause bacterial growth.”
What to look for in an electric dehydrator
Ward says that dehydration works through the combination of time, airflow and heat. Because airflow is the key to success, she recommends models with reliable rear-mounted heating elements, temperature controls, evenly spaces trays, and an efficient fan to circulate air.
Both Ward and Hurt advise against cheap, stacked models for a variety of reasons, noting that these units do not typically allow for enough airflow or space between trays. Some don’t have fans to circulate air, or heating elements, and can result in uneven dehydration or worse, bacterial growth due to insufficient dehydrating. In some cases, moisture will drip down into the heating element, which can smell up your house or even short the wiring and destroy the dehydrator. If at all possible, investing in a dehydrator that evenly circulates air will give you better quality, safer results and years of use.
So what do they recommend? Hurt says, “most modern dehydrators, from the low end to the very high end, have the two things you need: an adjustable temperature gauge and a timer. On the low end, they’re stackable, and on the high end, they have built-in shelves,” adding that you should look for a larger model if you plan to put up a lot of food.
Ward recommends The Excalibur, which has excellent airflow, adjustable temperature settings, and trays that slide in and out, allowing for sufficient airflow. Excalibur makes multiple sizes and models depending on your needs, though they are somewhat more expensive than other choices. She adds that “other brands have tweaked the Excalibur design; most are generally pretty OK,” but adds that choosing a model that allows you to customize the critical components of time, airflow, and heat, is key.
While she doesn’t recommend cheaper models, she says if you have to get a stackable unit to choose one with the heating element on top — like the Nesco Gardenmasters —to prevent drips and shorts. She cautions against used dehydrators too: Many end up in thrift stores because they aren’t working well, but if you want a second-hand Excalibur or other high-quality machine, you may have luck with local buy/sell groups.
Space is a consideration, too: You want a dehydrator that has a large enough capacity to preserve your food, but not so large that it takes up precious storage space. Hurt recommends a collapsible dehydrator, noting they cost a bit more, but for a city apartment or a tiny house, these are the best answer: “They expand to hold larger shelves, but when you’re done dehydrating, they fold back down, and you can tuck them away in your storage.”
Non-electric options
If you live off-grid, or want to try dehydrating without spending money on a new appliance up front, there are a few options for you. People have been drying food in the sun for thousands of years, and you can too. Just as with an electric model, the key to success is heat, airflow and time.
There are many plans online for building a solar dehydrator, but there are a few key components to look for. First, make sure it is able to provide airflow while keeping pests away from your food. Second, make sure it has sufficient surface area to dry things in a single layer, and that it can dry your food without scorching it or drying so slowly that you risk contamination. While this plan is for a dehydrator that holds a good amount of food, it is a good example of an off-grid solar dehydrator that you can build at home.
You can also give dehydrating a shot simply by using your oven to dry your food. The trick with an oven is to get it the right temperature: You want it to be under 200 degrees Fahrenheit to avoid scorching your food. Ideally, you want it closer to 140 degrees (if your oven has a ‘keep warm’ function, it may work well for this). For ovens without good airflow, cracking the door can prevent moisture build up. Place your produce on racks and, after a few hours, check your food to see if it’s drying evenly. It’s helpful to flip it at least once during drying to prevent sticking, too. Oven drying can take upwards of eight hours to finish.
What to make with a dehydrator
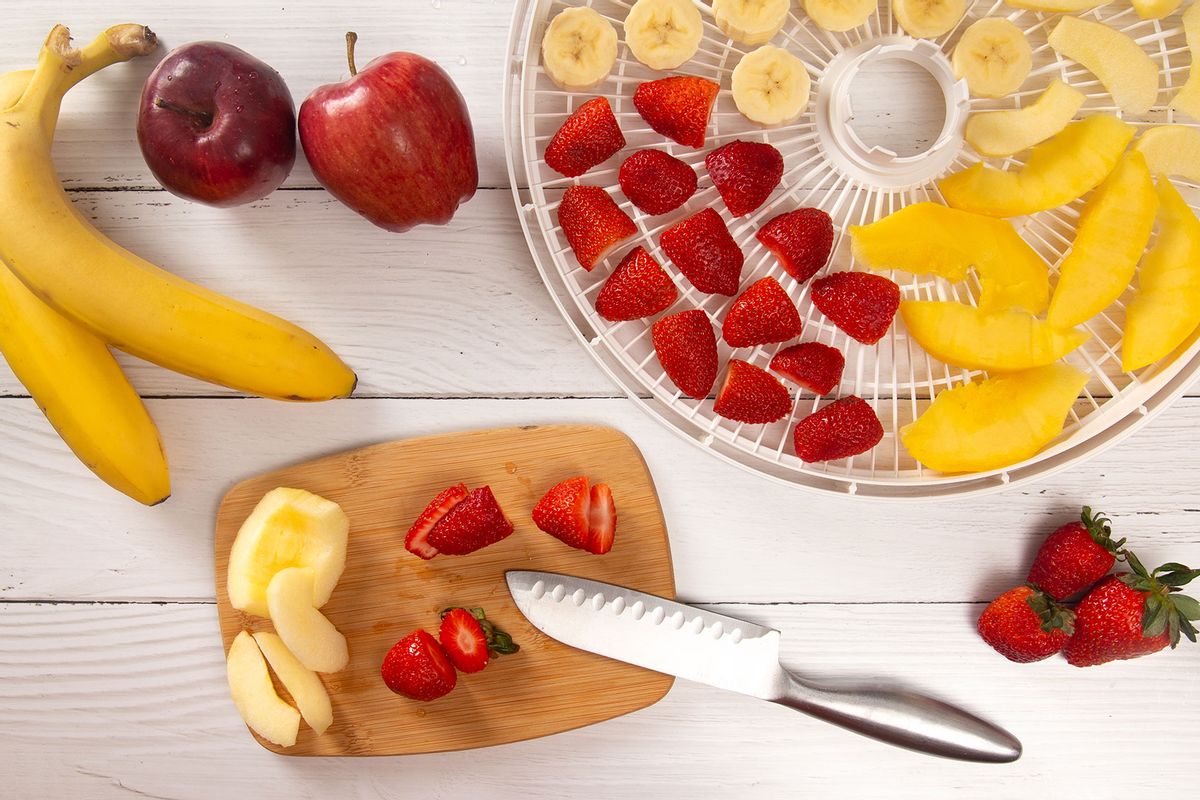
If you’re new to dehydrating food, the best place to start is with sliced fruits and vegetables or fresh herbs. These are some of the easiest things to dry, and offer an introduction to the process without sinking a bunch of money on ingredients. Make sure to evenly slice your produce so it dries at the same rate.
When asked “what can you make with a dehydrator?” both Ward and Hurt provided long lists, suggesting that the possibilities with dehydrators are limited more by your imagination than by the technology itself. Hurt says, “You can dry basically everything except for milk.” Some of their suggestions include fruit leathers, grains, nuts, jerkies, dried herbs, spice blends, dried fruit chips, fruit and veggie mixes (dried berries, mirepoix, etc.). You can also use whole vegetables, like green beans, shucked peas and corn, and sliced or cubed potatoes, which can be dried and reconstituted later. Ward adds that reconstituted vegetables won’t have the same mouthfeel as fresh ones, so are best as an ingredient for a recipe that will be cooked or baked, like stews, soups and casseroles.
For some dehydration projects, you may need to get some accessories beyond the dehydrator itself. Hurt says you’ll need silicone sheets to make fruit leather in an electric dehydrator, for example, to keep it from sticking to trays or tearing apart. If you aren’t sure, dig around online for inspiration and to see what other home cooks are using to preserve their food.
Reducing food waste with a dehydrator
Tossing food scraps in the dehydrator is a wonderful way to get creative in the kitchen and cut down on waste. Here are a few suggestions:
Powders and seasonings
Ward says that dehydrating a fruit or vegetable completely, then grinding it into a powder makes a great add-in: think powdered tomato added to red sauce, or apple powder to pies, to intensify the flavor. “My favorite work around for canning pumpkin butter: dehydrate pumpkin, grind to powder, add spices as wished, then add to apple sauce and cook . . . the only safe way to can “pumpkin butter!”
Hurt encourages creativity beyond fresh fruits and veggies, noting you can even dry leftover tomato paste and turn it into tomato powder.
Dried veggies and fruit
Hurt says, “you know that celery that’s going bad in your refrigerator? Chop it up, and toss it on a dehydrator – then throw it into soups or sauces when you need it.” The same is true for your fruit that’s going soft or even for those bananas that are turning brown: They can become tomorrow’s dried snacks to eat alone or used as a topping for ice cream or a yogurt parfait.
Fruit leather
Ward encourages turning your overripe berries into fruit leather: Just clean, puree, mix with applesauce, then dehydrate. If you have a prolific rhubarb plant, consider putting the stems to work in your dehydrator: Hurt notes that it’s a great fruit leather base (she also recommends chopping and drying some rhubarb too, for summer-y pies in the middle of winter).
Dog treats
Hurt dries fish skins and sweet potato skins as dog treats, which are essentially the same as the expensive treats from the store, and urges you to chop and dry the gizzards from your roasted birds, too: “I call those bits magic fairy dust for dogs – they go wild for them.”
Cocktails and mocktails
Hurt recommends dried citrus for garnishing cocktails, as well as citrus scraps to flavor your drinks: For example, that leftover orange from zesting can be cut up and dehydrated, then floated on a cocktail: she says “they taste like sweet and sour candies.” And, before you juice a lemon, zest it first, then dry that zest as an add-in for baking and cocktails. Ward stirs her mystery mix fruit powders into sugar to rim cocktail glasses. Trash Collective has other creative ideas to explore, too.
Mystery mixes
If you have a big cooking day ahead of you, Ward suggests saving your edible leftover vegetable bits (peels, ends, etc.), chopping them into uniformly sized pieces, and dehydrating them to make Mystery Soup mix. She keeps a storage container of these mystery veggie pieces that she keeps adding to, noting: “when you reach about 4 cups worth, make a slow-cooked vegetable stock.”
For fruits, she separates them by family (stone fruits in one batch, berries in another, etc.), and makes another mystery mix that can be ground into powder or used in chunks for winter fruit cakes and steamed puddings.
Crackers
If you use a juicer, you likely have a lot of leftover pulp. Ward dehydrates vegetable pulp along with seasonings and soaked chia seeds and even nuts, using the same method as fruit leather, to make raw vegan crackers. You can do the same with fruit pulp, chia seeds, and maple syrup or sugar for sweet crackers.
Flex your creative muscles
A dehydrator can be a powerful tool in your arsenal of waste-reducing equipment, and can help you get creative in the kitchen. These ideas are just the tip of the iceberg when it comes to reducing waste and putting up all your garden (or farmers’ market) bounty: You can makes dried super greens powder for your smoothies, for example, or even dry out your fermented food scraps.
Just make sure you store your dehydrated goodies properly for the longest shelf life: Both Ward and Hurt recommend storing in an airtight container in a cool, dark place, and note that not all dried foods will keep the same length of time (Jerky, for example, is not 100% dried). According to Ward, the more moisture a given food has, the shorter its shelf life.
Hurt says that your dehydrated foods will keep for about a year if stored in a cool, dark, place, but that meat and fish should be used more quickly. You can keep your new culinary experiments in canning jars with screw-on lids, tight, double-rowed “ziploc”-style bags (or reusable silicone zipper bags), or other plastic and glass containers with tight-fitting lids.